What You Should Know
What You Will Learn
- What a barre chord is
- Basic technique and exercises for playing barre chords
- Simple three- and four-string barre chord voicings
How to Play Barre Chords
What is a Barre Chord?
Barre chords are chords where two or more strings at the same fret are played with the same finger. This is done by flattening the finger out so that it can "barre" several strings at once. The index finger is most frequently used for the barre, but other fingers may be used for some chord voicings. Barre chords are useful because most of them can be moved up and down the neck. This make it easy to play in any key and transpose music from one key to another. These chords are one of the most difficult hurdles for a beginner to overcome, but are well worth the effort.
Barre Chord Technique
Playing barre chords properly requires careful attention to several things, including hand position and the amount of pressure to use. Many beginners use a great deal of pressure when playing barre chords, which causes their left hand to become very tense. You do need to develop some strength in your left hand in order to play barre chords, but dexterity and control are far more important. It is likely that your fingers will feel weak when you first start learning barre chords, but it is important to stay relaxed and press only hard enough to get a clear sound from each string in the chord.
Hand Position
Your thumb should be behind the neck rather than hanging over the fretboard. The thumb provides stability and puts your hand and arm in the proper position for playing when it is placed correctly behind the neck. Make sure your thumb is relaxed and isn't pressing against the back of the neck.
The Barre
You have likely used your fingertips for anything you have played up until now. Barre chords require you to use the entire finger in some chords. This may be somewhat uncomfortable or painful to your skin at first due to the strings pressing into your finger, but you will get used to this after enough practice.
Angle Your Finger
The index finger should be angled slightly toward the headstock of the guitar when playing a barre. This can be accomplished by bringing your elbow in toward your body slightly. This positions the finger in such a way that the barre is played with the part of the finger in between the flat part on the palm side (opposite the side of your finger where the nail is) and the side of the finger. This achieves several things:
- 1. Allows the finger to curve slightly, which facilitates a cleaner barre. While curving the finger is possible with the finger flattened out instead of angled, it requires more pressure to get a clean chord.
- 2. Makes the barre more comfortable, since it is a more natural position for the hand and the skin on this part of the finger is often less sensitive than the flat inside area of the finger.
- 3. Reduces the amount of pressure required to achieve a good barre along with making it easier to avoid pressing against the neck with the thumb.
- 4. Results in a slightly better position for the other fingers to play the rest of the notes in the chord.
Most barre chords use the index finger, so this advice applies to these chords only. Chords that use another finger for the barre may require a different approach.
The Other Fingers
The other fingers should be positioned so that they don't mute other strings when playing a barre chord. Play each string individually to make sure you aren't accidentally muting one or more strings that should sound. If you are muting any strings inadvertently, follow these steps to correct the issue:
- 1. Look carefully at your fingers while playing to try and determine which finger is muting the string. Note that it isn't always the finger that is playing the note. Sometimes a finger playing a note on another string is angled in such a way that it is muting a note on a different string.
- 2. Adjust the position of the finger until the string rings.
Changing the Position of Your Fingers
You can change the position of your fingers by:
- 1. Moving the finger itself. The finger can be moved so that it is positioned in a slightly different location between the frets. Sometimes even moving a finger slightly toward or away from a fret is enough to get a clear note.
- 2. Moving your wrist and/or elbow toward or away from your body. This often facilitates a better angle for the barre, while also allowing a more comfortable position for fretting the other notes in the chord.
- 3. Moving the arm from the shoulder joint. This movement can be toward your body or away from it.
Dealing with Problems
Barre chords require a bit more flexibility and dexterity due to the additional stretch required and the fact one of your fingers is playing the barre while other fingers fret the rest of the notes in the chord. This makes it very easy for excess tension to occur. Avoid this by doing the following:
- 1. Press on the strings only hard enough to allow it to ring. This is often much less pressure than you are currently using, so constantly experiment to find the perfect amount of pressure for each chord.
- 2. Practice new chords higher on the neck where the frets are closer together. This will reduce the stretch required for playing the chord. This should make it easier to play the chords. Around the seventh fret is ideal. The frets are reasonably narrow, but not quite as narrow as frets higher on the neck. Playing barre chords can be difficult if you go too high on the neck due to the closeness of the frets.
- 3. Avoiding pressing against the neck with the thumb. This will often cause the rest of the hand to become tense.
Three-string Barre Chords
Barre chords are traditionally taught using five- and six-string chords. This approach works for some students, but is quite a jump from playing simple first position chords. For this reason, this lesson starts with barre chords that use only three strings. The two three-string voicings in this lesson are based on first position chords that you should already know: E major and E minor.
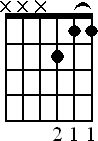
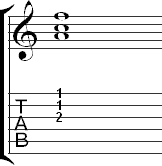
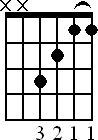
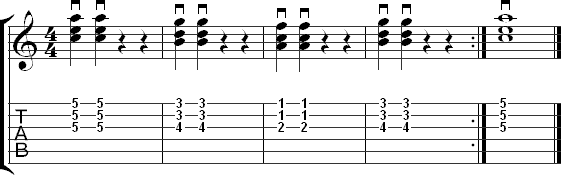
Three-String Major Barre Chord
Chord Diagram
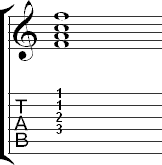
Tablature
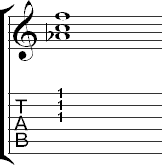
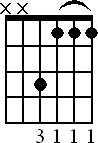
Three-String Minor Barre Chord
Chord Diagram
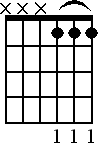
Comments
The E minor voicing is based on the top half of a first position E minor chord. The root is found on the first string.
Tablature
Four String Barre Chords
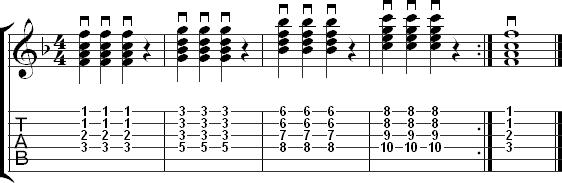
Four-String Major Barre Chord
Chord Diagram
Comments
This voicing is based on the first position E major chord and adds one string to the three string voicing you learned earlier in this lesson. The root of this chord can be found on both the fourth and first string. If you are paying close attention, you should notice that this is the exact same voicing for the F major chord you learned in the lesson on beginning chords.
Tablature
Four-String Minor Barre Chord
Chord Diagram
Comments
The four-string E minor voicing is based on the open E minor chord. The root of the chord is found on both the first and fourth string.
Tablature

Moving Barre Chords Around the Neck
You need to do two things to move a chord around the neck:
- 1. Find the root of the chord in the barre chord you are using.
- 2. Find the root note of the chord to which you want to move.
Finding the Root
A barre chord can be moved by knowing the string(s) on which the root of the chord occurs. It isn't necessary to understand the theory behind chord construction to do this, although it is helpful. You only need to know the string where root occurs. Note that a root may appear multiple times in the same chord voicing. In chords with the root note on more than one string, you may use any one of the roots for transposing the chord. The result will be the same chord no matter which root you use. The location of the root is provided for all of the chords in this lesson.
Moving the Chord
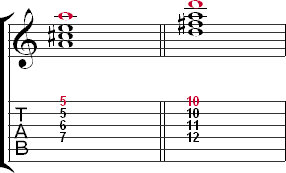
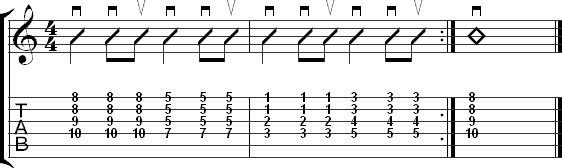
To move the chord, you need to find the root of the chord you want to use instead of the chord you are playing. Both notes should be on the same string. This requires knowing the notes on the guitar. For example, if you are playing an A major barre chord and want to move to a D major barre chord, you need to find the root of the A major chord, which is A. If the root of the A major chord occurs on the first string, you need to find a D on this string to move to D major. D occurs at the tenth fret on the first string, so moving the chord to the tenth fret will give you a D major chord. This is shown in the image below. The roots on the first string are highlighted to make it easy to see how this chord was moved from A major to D major.
How to Practice Finding Roots
Try finding major and minor barre chords on each of the following roots: A, Bb, B, C, C#, Db, D, Eb, E, F, F#, G, G#, and Ab. All of the chords in this lesson have roots on the first string, so this should be relatively easy. However, you should also try moving the four-string barre chords around by using the root on the fourth string for additional practice.
Exercises
Don't start on these exercises until you can play all four barre chords cleanly.
Tips for Playing the Exercises
The exercises below use chord progressions that will require you to move up and down the neck. This can be difficult at first, but there are a few things that will make it easier.
Keep Your Index Finger in Position
The major and minor chords require only a small change to switch from major to minor or from minor to major. You only need to place the middle finger on the string or remove it to make this switch. For this reason, you should try to keep your fingers in the barre position when moving up or down the neck. You will have less to do once you reach the new chord position.
Know Where You Are Going
Look at the fret where the next chord is located before moving so you know exactly where you need to go. You eventually want to be able to do this without looking, but it is good to look at first so you can learn to switch more quickly and accurately.
Practice with Three-String Voicings First
Only one exercise is given for practicing three-string barre chord voicings, but you can practice the other exercises with these voicings instead of the four-string voicings by leaving the fourth string out of the chord. This should make it a little easier to learn the exercises. However, you should eventually practice the exercises as written.
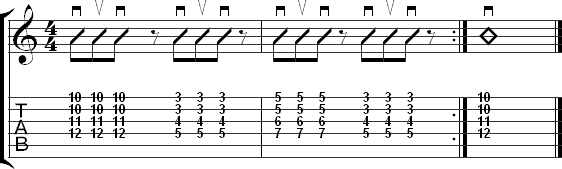
Exercise 1
Exercise 1 is a chord progression in A minor. There are two beats of rest in between each chord change, so make use of this time to get to the next chord. You should begin moving into position immediately at the start of the rest on the third beat of each measure. This is a good opportunity to practice switching between chords. You won't always have beats of rest to make the switch, so work on perfecting your switching technique with this exercise.
The right hand should play all downstrokes for this exercise. Mute the strings during the rests to avoid string noise.
Exercise 2
Exercise 2 is a progression in F major that uses four-string major and minor barre chords. This requires a little more moving around than exercise 1, but you still have beats of rest to get into position for each chord. The rests are reduced to a single beat here, so you need to move from one chord to the next a little more quickly.
Exercise 3
Exercise 3 is a chord progression in D major that uses four-string barre chords. The riff may remind you a little of the riff to songs like Louie, Louie or Wild Thing. This is because the chord progression and rhythm are similar. The rest is reduced to a single eighth note in this exercise, so you need to be even more efficient at changing chords than in the two previous exercises.
Exercise 4
Exercise 4 is a progression in A minor with some chromatic chords in between chords in the key. A chromatic chord is a chord that doesn't occur in a key. In this exercise, the chromatic chords occur on the "and" of beats two and four in each measure.
There are no rests in this exercise. However, the chords only move up or down one fret at a time, so the switching is relatively simple. You can slide your fingers along the string to move from one chord to the next, although it would be better to lift your fingers off the string when switching to the next chord to avoid string noise, but this is a more advanced technique.
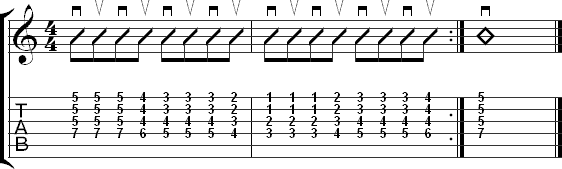
Exercise 5
This exercise will be more challenging due to the distance between each chord and the fact that there are no rests. The chord progression here is a I vi IV V progression (in C major), which was commonly used in 50s rock. If you find the chord changes difficult, try just playing the chords without the right hand strumming pattern. Once you can switch between the chords smoothly, add the strum pattern.
Additional Practice
Use the chord progression reference to find progressions of major and minor chords and try to play them with the barre chord voicings in this lesson. Some will be more difficult due to large distances between the chords on the fretboard. Try playing the progressions in as many keys as possible while paying attention to where the roots of the chords are on the neck. This will help you learn the notes on the guitar, which is essential for learning to play barre chords in all keys.
Comments
The E major voicing is based on the top three strings of the first position E major chord. The root of the chord is found on the first string. This means that if you play the chord at the first fret, the resulting chord is F major.
This voicing is the top half of a six string voicing that you will learn later.