What You Should Know
What You Will Learn
- The proper technique for playing chords fingerstyle
- Exercises for plucking chords
How to Pluck Chords
The Technique
Plucking chords involves playing the notes of a chord at the same time. This is the easiest fingerstyle technique because there is very little need for independence of the fingers. The guidelines below should be kept in mind while you play through the exercises.
Play with a Full Sound
Make sure you are plucking the strings by moving the fingers at the joint where the fingers meet the hand. Try to get a full, even sound when you pluck chords. No notes in the chords should be louder than the others. If you notice that you are playing any notes in the chords significantly louder than the others, you need to gain control over your right hand. Pay attention to the motion of your fingers to make sure that your movements are controlled, relaxed, and even. Tension and jerky motions will lead to a harsh sound and a lack of evenness.
Make Sure the Thumb and Fingers are in Sync
Watch out for unevenness in rhythm between the thumb and fingers. The fingers and thumb should move simultaneously to pluck the strings. Any hesitation in one or the other could cause notes to sound at different times or some notes to sound louder than others.
Use Your Wrist
There should be a slight outward motion of the wrist when plucking each chord. If the motion of your fingers and thumb are correct, the wrist should move naturally as part of the follow-through for plucking each chord.
Get Into Position Before Playing the Chord
Your fingers should be in place slightly before you pluck each chord. Place your thumb and fingers on the strings to be plucked in preparation for playing the chord.
Moving Chord Tones Over a Stationary Bass
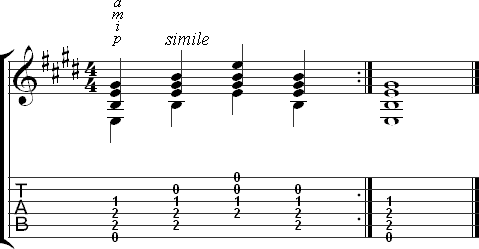
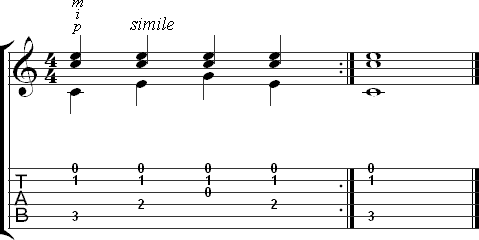
In these exercises, you will be playing chords where thumb plays the same note in the bass throughout the exercise, but the notes played by the fingers change.
Exercise 1
The first exercise uses the thumb and two fingers to play through the notes in a C major chord.
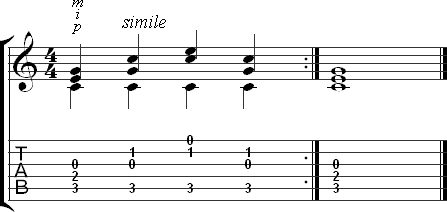
The exercises in this lesson are shown with only a few chords, but they should be practiced with other chords for variety.
Exercise 2
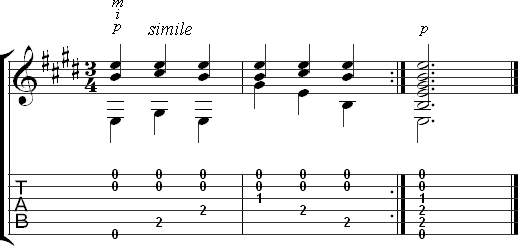
Below is the same concept using an E major chord. This will give you experience playing with a slightly wider distance between the bass and treble notes since all six strings are involved.
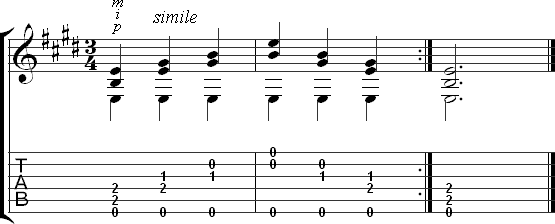
Exercise 3
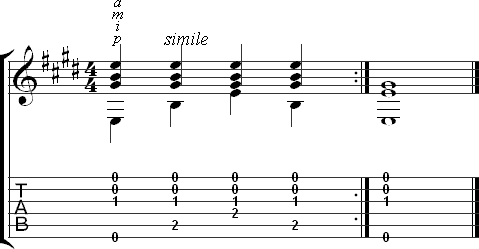
Exercise 3 is similar to Exercise 2, but the thumb is used with three fingers instead of two. This may be a bit more challenging due to the addition of the ring finger.
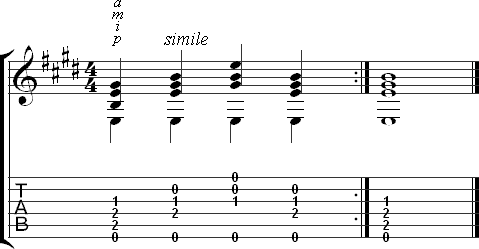
Moving Bass Note Below Chord Tones
The fingers remain in the same place while the thumb moves up and down the notes of the chord in the bass in these exercises.
Exercise 4
Exercise 4 is based on a C major chord. The thumb moves between the third, fourth, and fifth strings while the fingers stay in the same place.
Exercise 5
Below is the same exercise on an E major chord:
Exercise 6
Exercise 6 uses three fingers with the thumb to play through an E major chord.
Moving Both Bass Notes and Chord Tones
The final set of exercises require both the thumb and fingers to move through the notes of the chord.
Exercise 7
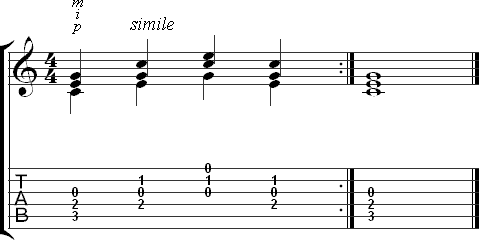
Play the following exercise with the thumb, index, and middle finger. You will need to move your arm slightly to adjust your position for each new set of strings.
Exercise 8
Exercise 8 uses the thumb and three fingers on an E major chord:
